

Gmail အဟက်မခံရအောင်
အခုတလော Website တွေအပြင် Gmail , facebook account တွေပါ hacking လုပ်ခံရတာတွေ များလာတာ တွေ့နေရပါတယ်.. မကြာသေးခင်က နာမည်ကြီး ဂျာနယ်တစ်စောင်ရဲ့ facebook account အဟက် ခံလိုက်ရပါတယ်.. Gmail ကနေဝင်ပြီး ဟက်သွားတယ်လို့ ထင်ပါတယ်.. ဆက်ပြီးတော့လဲ နာမည်ကြီး account တွေ ဟက်မယ်လို့ ထင်ရပါတယ်.. facebook account ကို ဟက်သွားတာဟာ Gmail ကဝင်ဟက်သွားတာ ဖြစ်လို့ Gmail ကို ပိုပြီး စိတ်ချရအောင် လုပ် ဖို့လိုပါတယ်။
ပိုပြီး စိတ်ချရအောင် Gmail က 2-Setup Verification ဆိုနဲ့ feature ထက်ပြီး ထည့်သွင်းလိုက်ပါတယ်.. 2-Setup Verification setup လုပ်ထားလိုက်ရင် နဲ့ အရင်လို login ID password ပဲ ရိုက်ထည့်ရုံနဲ့ မရ တော့ပါဘူး။ Gmail ဝင်တာနဲ့ Google က ဖုံးခေါ်ပြီး ဖုံးကိုနားထောင်ပြီး သူပြောတဲ့ CODE ကို ထည့်ပြီး verify လုပ် ဝင်ရမှာ ဖြစ် ပါတယ်။ ဒီတော့ တခြားသူက ကိုယ့် password ကို သိလို့ ဝင်တယ်ဆိုရင်တောင် ဖုံးမရှိရင် ဘယ်လိုမှ ဆက်ဝင်လို့မရတဲ့ အတွက် စိတ်တော်တော် ချရမှာ ပါ။
အဲဒီမှာ ပြောစရာရှိတာက Google က ဖုံးတကယ်ခေါ်လားဆိုတော့ ခေါ်ပါတယ်.. setup လုပ်တာနဲ့ကို ခေါ်ပါတယ်.. ဒါပေမယ့် ဝင်တိုင်း သူဖုံးခေါ်နေတာ က စိတ်ချလို့မရပါဘူး အဲဒီတော့ ဖုံးခေါ်တာ စောင့်မယ့်အစား Google Authenticator ဆိုတဲ့ software လေးကို ထည့်ထားလိုက်ရင် ဖုံးအခေါ်လဲ စောင့်စရာ မလိုဘူး software က verification code ကို အလိုလို ထုတ်ပေးတဲ့ အတွက် ပိုအဆင်ပြေတာ တွေ့ရပါတယ်။
အောက်မှာ ဖော်ပြထားတာကတော့ မိမိ Gmail ကို ပိုပြီး စိတ်ချရအောင် 2-Setup Verification setup လုပ်နည်းနဲ့ Google Authenticator ကို ဘယ်လိုသုံး မယ်ဆိုတာလေးကို ဖော်ပြပေးလိုက်ပါတယ်။
Posted by : မောင်လှ http://blog.mghla.net
ဒီ Gmail + Google Authenticator (ပိုမို စိတ်ချရတဲ့ Gmail Account ဖြစ်အောင်…) ပြုလုပ်တာဟာ လုပ်ရင်း အဆင်မပြေမှုတွေဖြစ်ပေါ်နိုင်တဲ့ အတွက် အရေးမကြီးတဲ့ Gmail Account မှာ အရင်စမ်းစေချင်ပါတယ်။ Gmail Account locked ကျသွားတာမျိုး၊ ဝင်မရတာမျိုး ဖြစ်ခဲ့ရင်တော့ ကျွန်တော် တာဝန်ယူမည် မဟုတ်ပါကြောင်း ကြိုတင် အသိပေး မေတ္တာရပ်ခံပါရစေ။
ကျွန်တော်တို့ရဲ့ Gmail Account များကို ပိုမို စိတ်ချရတဲ့ Gmail Account ဖြစ်အောင် ပြောင်းကြရအောင်ပါ… အဲဒီလို ပြောင်းဖို့ အတွက် ဘာတွေလိုအပ်မလဲဆိုတော့
- Google Authenticator အင်စတော လုပ်ထားတဲ့ Android/iPhone/Blackberry handset (၁)လုံး၊
- Google က ပြန်လည် ခေါ်ဆိုလို့ရမယ့် ဖုန်းလိုင်း (သို့) sms လက်ခံနိုင်မယ့် ဖုန်းလိုင်း၊
- ကွန်ပျူတာ၊ အင်တာနက် တွေလိုအပ်ပါတယ်…
ကျွန်တော်တို့ အခုလုပ်မယ့်ဟာကို Gmail မှာ 2-Setup Verification လို့ google က သုံးနှုန်းပါတယ်…
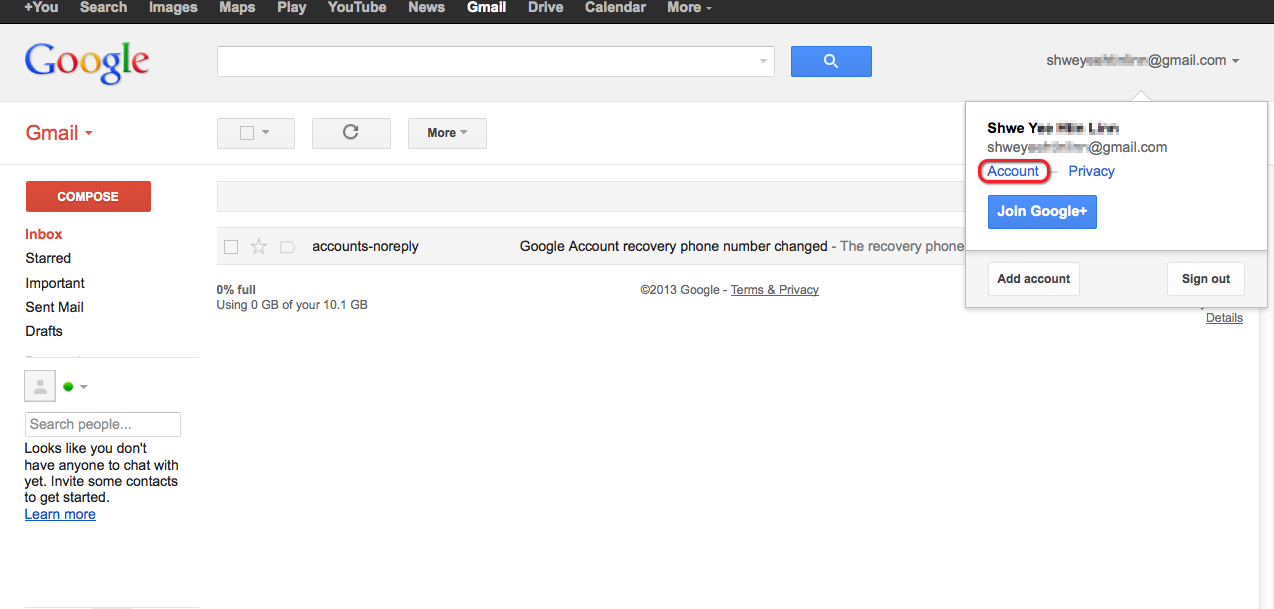
1. ကွန်ပျူတာကနေ Gmail ထဲကို ဝင်လိုက်ပါ။ mail စစ်လို့ရ၊ ပို့လို့ရတဲ့ နေရာကို ရောက်ပြီဆိုရင် screen ရဲ့ ညာဘက် အပေါ်ထောင့်က email လိပ်စာပေါ် click လုပ်ပြီး ပေါ်လာတဲ့ pop up menu ထဲက Account ကို click လုပ်။
2. ပေါ်လာတဲ့ Accounts page ထဲက Security ကို click နှိပ်ပါ။

3. 2-step verification Status: OFF ရဲ့ ညာဘက်က Edit ကို click နှိပ်ပါ။

4. အောက်မှာပြထားတဲ့ ပုံအတိုင်း Signing in with 2-step verification screen ထဲက Start setup ကို နှိပ်ပါ။

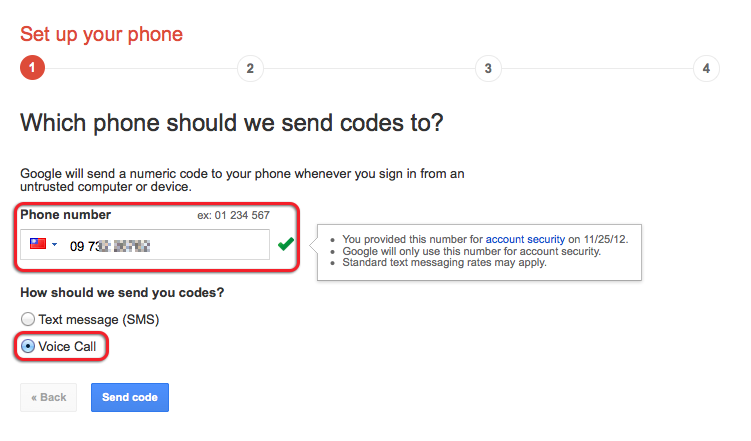
5. Set up your phone အဆင့်မှာ Google က ပြန်လည် ခေါ်ဆိုလို့ရမယ့် ဖုန်းလိုင်း (သို့) sms လက်ခံနိုင်မယ့် ဖုန်းလိုင်း နံပါတ်ကို ရိုက်ထည့်ပေးပါ။ ကျွန်တော်တို့ ပြည်တွင်းမှာသုံးနေတဲ့ ဖုန်းတွေက နိုင်ငံခြားက ပို့တဲ့ sms လက်ခံလို့ မရသေးတဲ့အတွက် Voice Call ကို ရွေးပြီး Send code ကို နှိပ်ပါ။
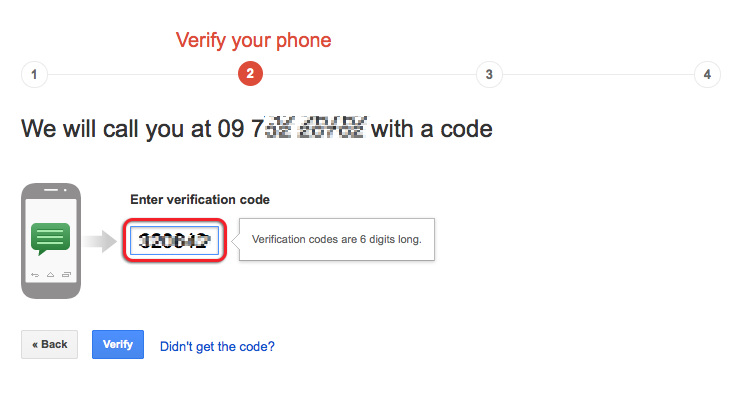
6. Verify your phone အဆင့်မှာတော့ Google က ပို့လာတဲ့ sms (သို့မဟုတ်) ဖုန်းကပြောလိုက်တဲ့ နံပါတ် 6-လုံးကို ထည့်ပြီး Verify ကို နှိပ်ပါ။
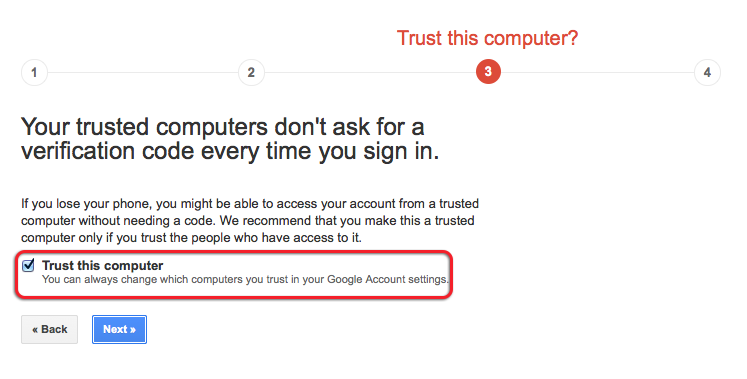
7. Trust this computer အဆင့်မှာတော့ အခု ကျွန်တော်တို့ လုပ်နေတဲ့ ကွန်ပျူတာက ကိုယ်ပိုင်သုံး ကွန်ပျူတာ ဖြစ်ရင်တော့ Trust this computer ကို အမှန်ခြစ် ခြစ်ပါ။ Username, Password သိရုံနဲ့ ဝင်ခွင့်မပြုချင်ရင်တော့ Trust this computer က အမှန်ခြစ်ကို ဖြုတ်ပါ။ Gmail ကတော့ အခုလုပ်နေတာ ကိုယ်ပိုင် ကွန်ပျူတာ ဖြစ်မယ်ဆိုရင်တော့ Trust this computer ကို အမှန်ခြစ်ခိုင်းပါတယ်။ ဒီအဆင့်မှာ Trust this computer ကို အမှန်ခြစ်ခဲ့ရင် အခု setting ချနေတဲ့ ကွန်ပျူတာသုံးတဲ့ browser မှာဆိုရင် Gmail login ဎင်ရင် ပုံမှန် အတိုင်း Username + Password ၂-ခုနဲ့ပဲ login ဝင်လို့ရမှာပါ။
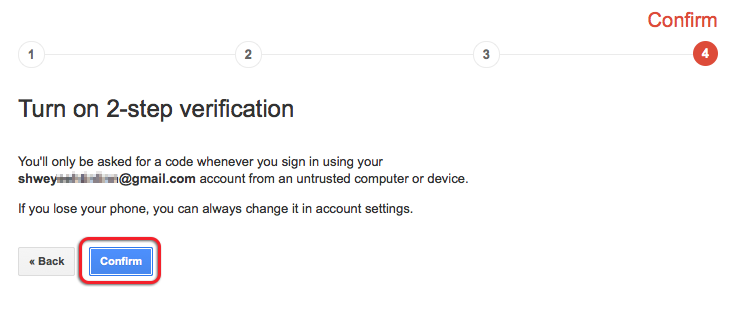
8. ဒီ Confirm အဆင့်မှာတော့ 2-setup verification ကို တကယ်အသုံးပြုမယ်ဆိုရင်တော့ ကို တကယ်အသုံးပြုမယ်ဆိုရင်တော့ Confirm ကို နှိပ်ပါ။
9. ဒီအဆင့်မှာ ပထမဆုံး ကျွန်တော်တို့ လုပ်ထားရမှာက Google Authenticator သုံးတဲ့ ဖုန်းပျောက်ခဲ့သည်ရှိသော် Gmail ကို ဆက်လက်သုံးနိုင်အောင် Show backup codes ကို နှိပ်ပြီး ပေါ်လာတဲ့ codes တွေကို သိမ်းထားပါ။
ကျွန်တော်တို့ Gmail login အတွက် verification code ထုတ်ပေးမယ့် အခါသုံးမယ့် ဖုန်း အမျိုးအစား Android – iPhone – BlackBerry ထဲက တစ်ခုခုကို ရွေးပါ။
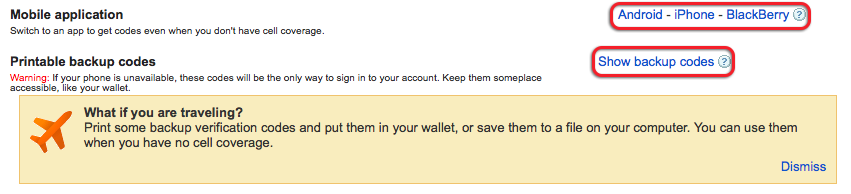
ကျွန်တော်က Android ဖုန်းအမျိုးစားကို ရွေးလိုက်ပါတယ်။
10. ကွန်ပျူတာ screen မှာ အောက်မှာ ဖော်ပြထားတဲ့ ပုံမျိုးပေါ်လာပြီဆိုရင် Google Authenticator app ထည့်ထားတဲ့ ဖုန်းကိုပါ လက်က ကိုင်ထားပါ။ ![]() ဒီအဆင့်ကို ကျွန်တော်တို့ ပြန်လာကြည့်ရပါဈးမယ်။ ဒီအောက်က ပုံကို မှတ်ထားကြပါ။
ဒီအဆင့်ကို ကျွန်တော်တို့ ပြန်လာကြည့်ရပါဈးမယ်။ ဒီအောက်က ပုံကို မှတ်ထားကြပါ။
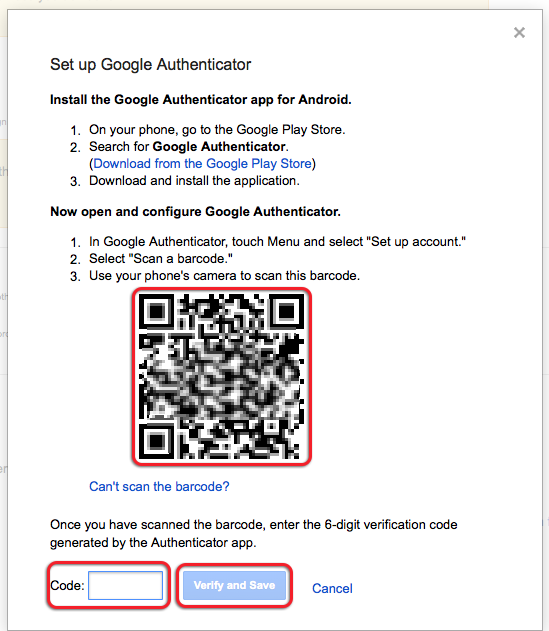
11.Google Authenticator App ထည့်သွင်းထားတဲ့ ဖုန်းမှာ Google Authenticator app ကို ဖွင့်ပါ။ ကျွန်တော့် Android ဖုန်းမှာတော့ အောက်က ပုံစံ အတိုင်း မြင်ရပါတယ်။ အဲဒီထဲက Scan a barcode ကို လက်နဲ့ တို့ထိလိုက်ပါ။ ကင်မရာရိုက်သလို လေးထောင့်ကွက် ပေါ်လာရင် ကွန်ပျူတာ screen မှာ ပေါ်နေတဲ့ အဆင့် (၁ဝ) က ပုံမှာ အနီနဲ့ ဝိုင်း ပြထားတဲ့ လေးထောင့်ကွက်ကြီး နေရာက ပုံစံမျိုး (QR Code)ကို ချိန်လိုက်ပါ။

12. ဖုန်းပေါ်မှာ အောက်မှာဖော်ပြထားတဲ့ အတိုင်း ကျွန်တော်တို့ setup လုပ်နေတဲ့ Gmail လိပ်စာနဲ့ ဂဏန်း ၆-လုံးပါ code ကို ဖော်ပြပေးပါလိမ့်မယ်။ ဒီ code ၆-လုံးကို အဆင့် (၁ဝ)က ပုံမှာ ပြထားတဲ့ အတိုင်း ပေါ်နေတဲ့ ကွန်ပျူတာ screen ထဲက Code: ဆိုတဲ့ နေရာမှာ ထည့်ပြီး Verify and Save ကို နှိပ်ပါ။
13. Google Authenticator setup successful တဲ့။ OK ကို နှိပ်ပါ။ ကျွန်တော်တို့ရဲ့ Gmail ကို login ဝင်မယ်ဆိုရင် Username နဲ့ Password သိရုံနဲ့ ဝင်လို့မရတော့ပါဘူး။ Google Authenticator app ထည့်ထားတဲ့ အခု ကျွန်တော်တို့ setup လုပ်ခဲ့တဲ့ ဖုန်းပါ ရှိမှ ဝင်လို့ရပါတော့မယ်။

14. ကျွန်တော်တို့ Google Authenticator အလုပ်လုပ်တာ စမ်းကြည့်ရအောင်ပါ။ အခု သုံးလက်စ browser မဟုတ်တဲ့ နောက်ထပ် browser တစ်ခုကို ဖွင့်ပြီး စမ်းကြည့်ရအောင်ပါ။ https://mail.google.com ကို ရိုက်ထည့်ပါ။ ပုံမှန်အတိုင်း Username နဲ့ Password တောင်းပါတယ်။ Sign In ကိုနှိပ်လိုက်ပါ။
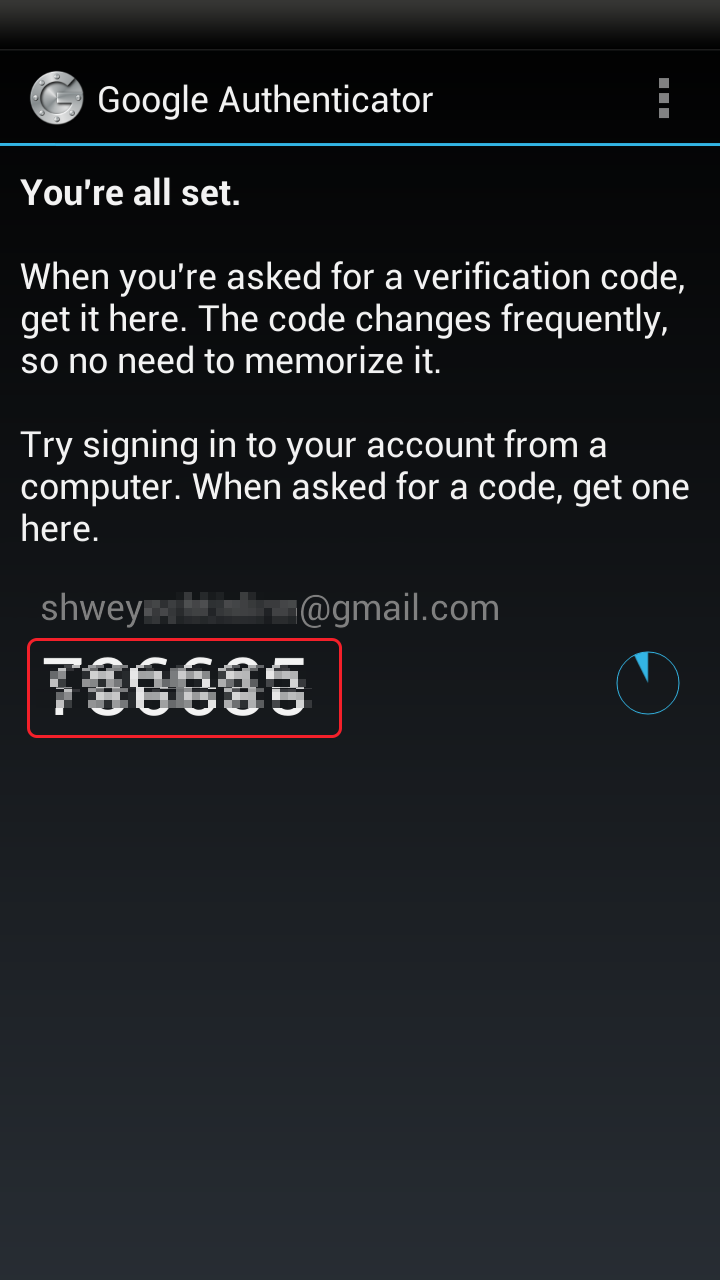
15. ပုံမှန်အတိုင်းမဟုတ်ဘဲ လာပါပြီ။ 2-step verification ဆိုတဲ့ screen ပေါ်လာပါပြီ။ Enter code မှာ code နံပါတ်တွေ မှန်အောင် ရိုက်ထည့်မှသာ ကျွန်တော်တို့ရဲ့ Gmail ထဲကို ဝင်ရောက်နိုင်တော့မှာပါ။ အဲဒီ code ကို ဘယ်က ယူမလဲဆိုတော့ ခုနက ကျွန်တော်တို့ setup လုပ်ခဲ့တဲ့ ဖုန်းပေါ်က Google Authenticator ကိုဖွင့်ပါ။ အဲဒီမှာ အခုဝင်ရောက်တဲ့ Gmail လိပ်စာနဲ့ ကပ်ရပ်မှာ ပေါ်နေတဲ့ ဂဏန်းတွေကို Enter code မှာရိုက်ထည့်ပါ။ Verify ကို နှိပ်လိုက်ရင်တော့ Gmail ထဲကို ဝင်ရောက် သွားမှာပါ။အခုသုံးနေတဲ့ ကွန်ပျူတာ+browser မှာ ဒီကုဒ်ကို နောက်ထပ် ဝင်တိုင်း ဝင်တိုင်း ထပ်မရိုက်ချင်ရင်တော့ Trust this computer ကို အမှန်ခြစ် ခြစ်ပါ။

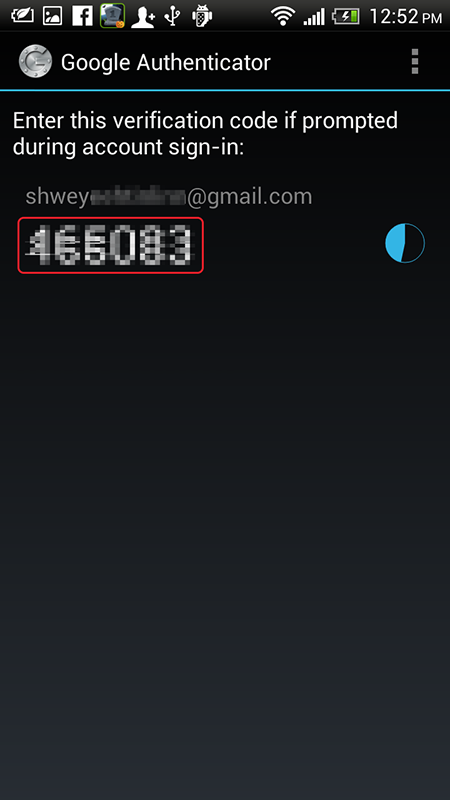 ဖုန်းပေါ်ရှိ Google Authenticator တွင် Verify code ထုတ်ပေးပုံ ယင်း verify code သည် တစ်မီနစ်ကို တစ်မျိုးပြောင်းသည်။
ဖုန်းတစ်လုံးပေါ်မှာ Google Authenticator နဲ့ Verify Code ထုတ်ဖို့ အတွက် Gmail Account တစ်ခုထက်မက setup လုပ်ထားနိုင်ပါတယ်။
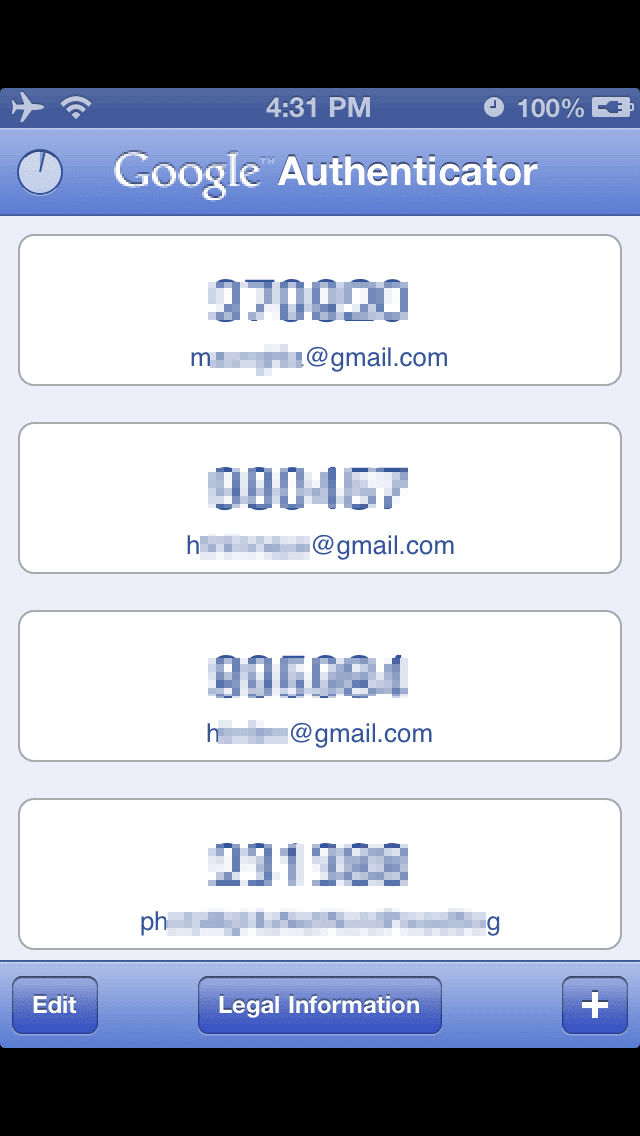 iPhone ပေါ်က Google Authenticator မှာ Google Account တွေ setup လုပ်ထားတာပါ။
Credit : မောင်လှ http://blog.mghla.net
_______________________________________________
Google Authenticator
")
QR CODE for download link


9 comments
Myo Thant
February 9, 2013 at 12:49 pm
ဗဟုသုတများ အတွက် ကျေးဇူးပါ
ဒါပေမယ့် အနော့်ဟမ်းဆက်က သရီးဂျီတောင် မရတဲ့ နိူကီရာ အိပ်စ်တူးမို့ ရဘူးထင်တယ်နော်
ဒီပို့စ်ကိုတော့ မှတ်ထားပါမယ်
ဘောနပ်စ်ထုတ်ရင်တော့ အိုင်မဖုန်းရင်တောင် အန်းဒရိုက် ဝယ်ပလိုက်မယ်
🙂
မောင်ပေ
February 9, 2013 at 2:31 pm
ဆြာအုပ်ရေ အချိန်ရမှ စမ်းကြည့်ဖို ့ရန် ၊ ဆြာအုပ် လင့်ခ်ကို ကူးသွားပါကြောင်း
kai
February 9, 2013 at 3:28 pm
စမ်းတော့ကြည့်ဦးမယ်..
လောလောဆယ်.. အောက်ကသတင်းဖတ်ပြီး.. ကျနေတယ်..စိတ်.. :buu:
Bush family emails hacked; ‘can happen to anyone,’ experts say
Los Angeles Times - by Molly Hennessy-Fiske - 11 hours ago
A hacker accessed emails and other information of the Bush family, including both former presidents.
P chogyi
February 9, 2013 at 4:21 pm
နာမည်ကြီးတဲ့အကောင့်ထဲမှာ ကျွန်တော်လည်းပါလို့
ဆြာအုပ်ကို Administrator ခန့်ပြီး ကာကွယ်မှရမယ်။
p chogyi ဆိုတော့ နာမည်မှာ ကြီးပါနေတယ်လေ။
ဂန္ဓာရီ ဆြာအုပ်
February 9, 2013 at 4:50 pm
ဒီ post ကို ထပ်ပြီးကော်ပီလုပ်ထားတဲ့ ကျွန်တော်တို့ ဘလော့ကတော့ မနက်ကပဲ အဟက်ခံလိုုက်ရပါတယ်
Mr. MarGa
February 9, 2013 at 6:18 pm
သေသေချာချာ ပြောနိုင်တာကတော့
ဂျီမေး အဟက်ခံရတယ်ဆိုတာက
ဂျီမေး သုံးသူတွေဘက်က အားနည်းချက်ကြောင့်ပါ
ဟက်ကာတွေက တခြား မေးလ်ဆာဗာတွေကို ဟက်နိုင်ပေမယ့်
ဂျီမေးဆာဗာကိုတော့ အခုအချိန်ထိ မဟက်နိုင်သေးပါဘူး
လက်ရှိ အဟက်ခံရတာတွေအားလုံးဟာ
အသုံးပြုသူတွေဆီက အချက်အလက်တွေကို တစ်နည်းနည်းနဲ့ ယူပြီး ဟက်သွားတာဆိုတာပါပဲ
ဂန္ဓာရီ ဆြာအုပ်
February 9, 2013 at 8:22 pm
ဂျီမေးဆာဗာကို ဟက်တာတော့မဟုတ်ဘူး spyware တွေလွှတ်ပြီး ဝင်တာဗျ.. အရင်ကတော့ cyber မှာသုံးတဲ့သူတွေ များလို့ password တွေအခိုးခံရတာပဲရှိပေမယ့် ခုတလော ပါသွားတာတွေက ကိုယ့် connection နဲ့ကိုယ် သုံးနေတဲ့သူတွေချည်းပဲဗျ
ကျွန်တော်တို့ဆီလဲ အဲလိုအီးမေးလ် တွေ ရောက်ရောက်လာတတ်လို့ တော်တော်ဂရုစိုက်နေရတယ်
မနက်က ဒီ post ကို ကျွန်တော်တို့ ဘလော့မှာ တင်တယ်.. တင်တဲ့ အချိန် စက်ထဲက kaspersky က virus alert လာပြတယ်
scan လုပ်တယ်.. တွေ့တယ်.. ၃ ခါလောက် စက်ကို restart လုပ်လိုက်ရတယ်.. ပြီးတော့ ဘလော့ ဟက်ခံလိုက်ရတယ်
စက်ထဲမှာ antivirus လိုင်စင်ဗားရှင်းထည့်ထားမှ ရမယ်ဆိုတာကတော့ သေချာတယ်
လိုင်စင်ဗားရှင်းဝယ်သုံးကြပါ
kaspersky ဆိုရင် 1 user ၉၀၀ဝ ပဲရှိတယ်.. 3 user ဆိုရင် ၁၈၀၀ဝ လောက်ပဲရှိတယ်
မဟာရာဇာ အံစာတုံး
February 9, 2013 at 6:28 pm
ဟုတ်ဒယ် …
ခုတလော တော်တော် ဟက်နေတယ် …
အိုက်ဒီ ကောင်တွေကလည်း …
လက် အငြိမ် မနေနိုင်ကြဘူးနဲ့ တူပါရဲ့ …
ကိုင်စရာ ပေးထားလိုက်ရ ကောင်းမလားပဲ ….
(လဂါး နောက်ဒါနော် … အဟီးးး)
ခု ချာအုပ် ပြောတဲ့ နည်းလေးကို စမ်းကျိလိုက်အုံးမယ် ..
ရှဲရှဲ .. သန်းကျူး .. အကြီးကြီးပါလို့ ……
Mobile
February 9, 2013 at 9:04 pm
Gမေးအဟက်မခံရအောင် အကောင်းဆုံးနဲ့ အသေချာဆုံးနည်းကတော့
Gမေးလုံးဝမသုံးချင်းကသာလျှင် အဟက်မခံရဖို့ အသေချာဆုံးနည်းဖြစ်ပါတယ်။
နောက်တာပါစာအုပ်ရေ
လေ့လာသွားပါ၏။